Best Gekko Molly Lineups On Bind

As any seasoned Valorant player will attest, the tactical depth and versatility offered by the game's various agents can dramatically shift the tide of any match. Among these agents, Gekko, with his unique Molly ability, has emerged as a favorite for many. His dynamic playstyle, combined with the right lineups, can effectively dominate the game's strategic landscape. But, the million-credit question is - what are the best Gekko Molly lineups on Bind to maximize your success rate?
In this comprehensive guide, we delve into the most effective and game-changing Gekko Molly lineups that the professional scene has seen in 2023. From the utility-centric to those designed purely for damage, these lineups promise to give you the edge, whether you're grinding the ladder or duking it out in high-stakes tournaments.
We will dissect each lineup in terms of its positioning, utility, timing, and its compatibility with other agents' abilities. Additionally, we will provide you with pro tips on how to best utilize Gekko's Molly and the agent in varying in-game situations and map locations, so you can outmaneuver your opponents every step of the way.
Gekko Molly Lineups
Gekko’s Molly is unique as opposed to other abilities of a similar kind in the game. It is not for instant damage, but more for area control. Anyone staying in the molly will instantly die rewarding you with the kill. However, it doesn’t deal damage to anyone staying in it until a certain period of time passes. What you get in return is the amount of space it covers, making it perfect for timed lineups and here you will find our best collected ones yet:
A Default

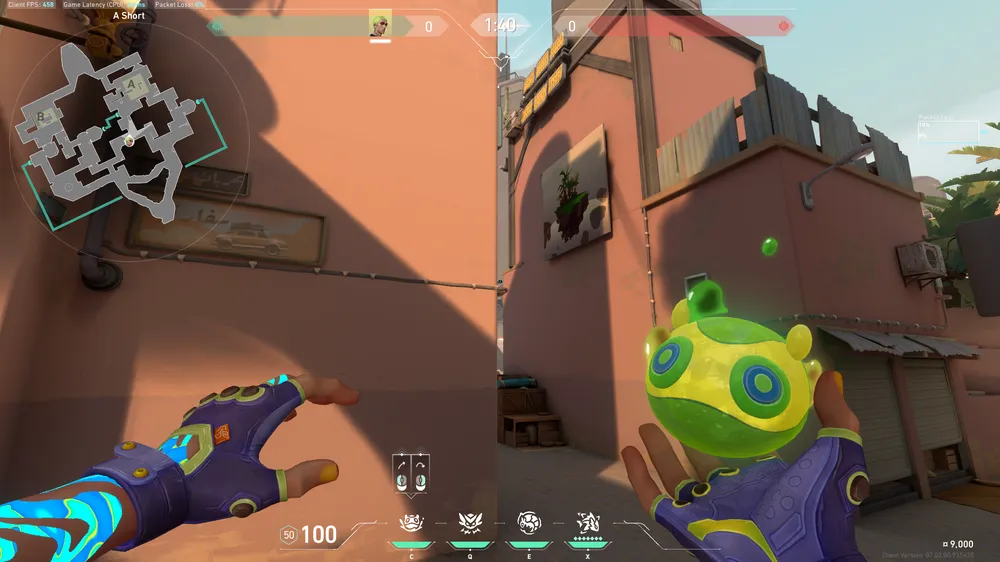
What Does It Cover: This lineup on A site bind will land exactly on the default planting spot, right in front of Trucks. With the Molly’s radius, it will cover Truck and the entire crossway into site and lamps as well.
When To Use It: Best used in post plant scenarios, however, this lineup is more for quick use when time matters and you need to ensure you get enemies off the spike as fast as possible.
What Makes It Special: Performing this lineup is very easy from A short, a tactical position that can help you fight off enemies and use your lineups comfortably at the same time.

Simply come on the benches in A lobby, look right above that pipe line from the spot, and then send your molly. It will go straight to the spike.
A Default Lurk

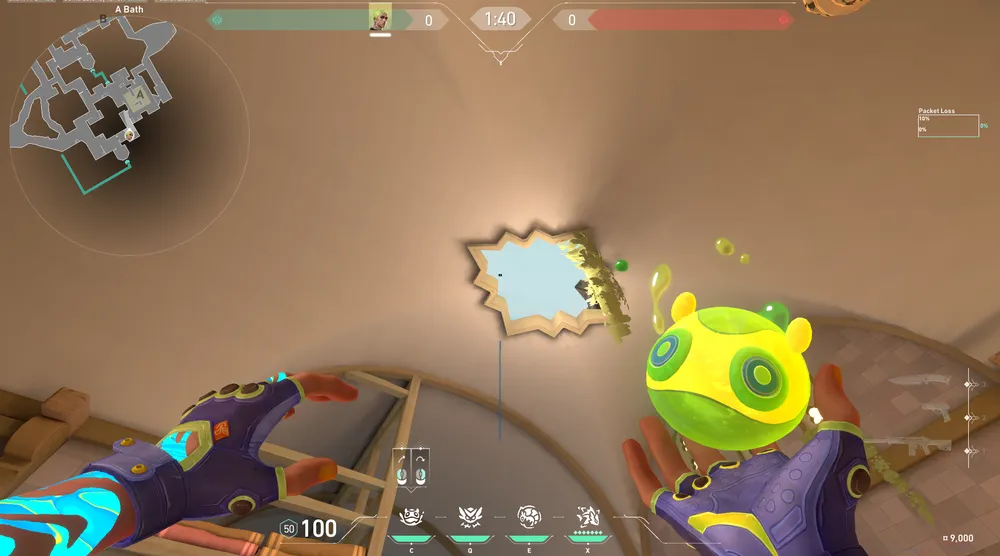
What Does It Cover: This line up will land on the same default planting spot in front of trucks with a little twist, you will be performing it from showers instead. Although it is important to mention that the difference of this position can cause a little bit more of a delay, keep that in mind as you play out rounds,
When To Use It: Best used in a post plant scenario where you try and wrap around to surprise the enemy with a late flank. If you are always playing short, it might be a good idea to try and go Late into showers, and with this lineup you secure winning the round even if your teammates die.
What Makes It Special: From that position, late showers, you will be able to pinch the enemy and be accompanied by the molly lineup you just learned that will secure you getting anyone off the spike as you flank.

To do the lineup, come over and stand around this area in showers, aim at the window on the top just as in the picture and then send your molly. It will take a few seconds and land exactly in front of trucks.
A Default 2

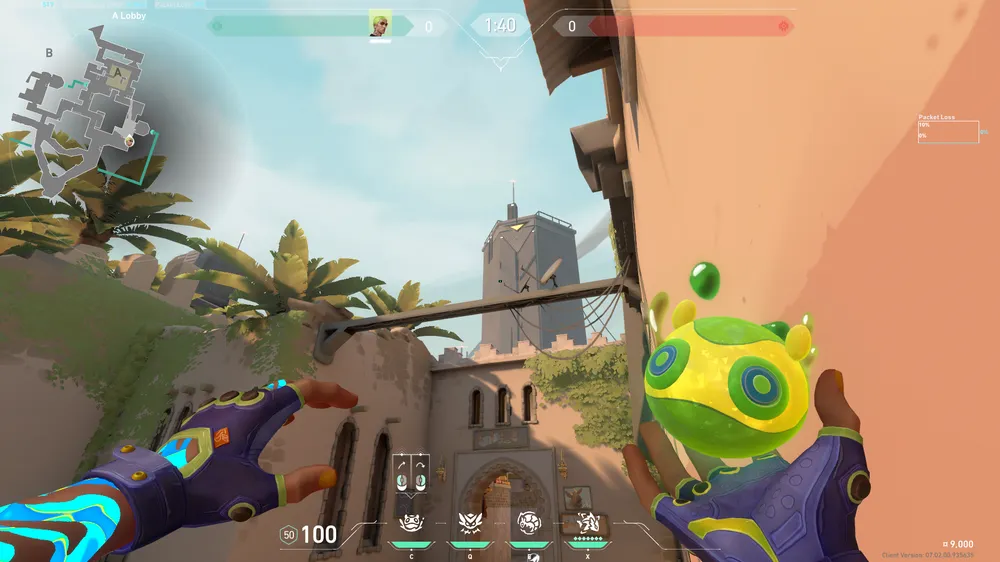
What Does It Cover: The third lineup on A site will hit towards the second default planting spot for showers, which is towards dice / green boxes.
When To Use It: Best used on eco rounds, as fast rushing showers is a valuable strategy and could work out even with low buy weapons. This lineup will help out with the round’s outcome.
What Makes It Special: Doing the lineup comes from a very safe and passive position, which gives you the opportunity to confuse enemies about where you might be.

Come over and stand by the corner in front of showers, aim your crosshair at that spot of the huge metal building and then simply throw your molly.
B Default

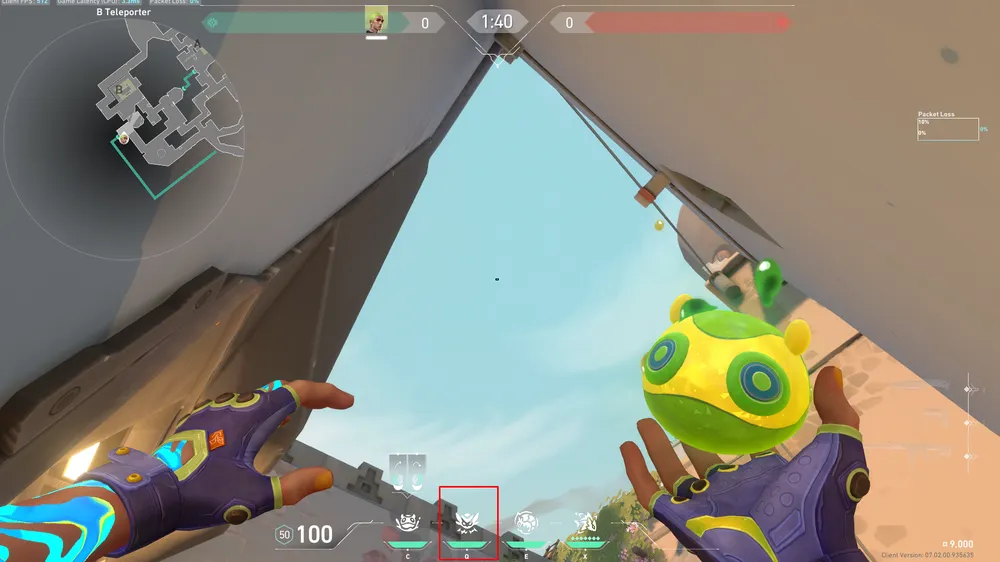
What Does It Cover: This lineup on B site will hit the default planting spot, right in front of tube.
When To Use It: Best used whenever you execute B site and want to play a post plant scenario as this molly lineup remains undefeated.
What Makes It Special: The molly will hit anyone in its radius which includes a big chunk of site, that disables the retaker’s ability to move around and take control.

Come over to the corner of B long (and make sure you are safe from enemy peeking) and then align your second ability icon with that spot on the wall, then send your molly.
Pro Tips
- Keep in mind that Gekko’s Molly works quite differently. It has a cooldown before it explodes killing anyone standing inside its radius, but it will not deal any damage until that timer has run out.
- Players can still dodge the molly by running out of it. This is because the molly’s damage comes fast but not in one instant making it possible for some to jump out of it at the right moment. That will still deal some damage though.
- Since your Molly takes time to activate, this could allow enemies to defuse the spike up to the half depending on the timing and usage of it. Keep that in mind going in any match and using your lineups.
- Always remember to ask for accompanying utility from your teammates as it can be a tremendous help for your own set of plays with Gekko. Especially in post-plant scenarios.
- Gekko’s Molly is the only piece of utility that you will be able to pick back up after using. So be precise and ensure that you only use it when you can capitalize on it.
- In case you use your Molly to clear an angle, do not look away from it just as you throw your ability. You will have to hold the corner for a bit more to ensure that nobody is there as if you catch enemies they will come out swinging and you want to be ready for that.
- Aside from teammate utility, you can always use Dizzy (Flash Ability) in pair with your Molly lineup. While enemies might stick to the defuse even if the molly hits them, they will definitely get off when fully flashed as they will be scared of you peeking or pushing toward them. In addition, it reveals their position which tells you if they are defusing or not.


