
Best Gekko Molly Lineups On Breeze

As any seasoned Valorant player will attest, the tactical depth and versatility offered by the game's various agents can dramatically shift the tide of any match. Among these agents, Gekko, with his unique Molly ability, has emerged as a favorite for many. His dynamic playstyle, combined with the right lineups, can effectively dominate the game's strategic landscape. But, the million-credit question is - what are the best Gekko Molly lineups on Breeze to maximize your success rate?
In this comprehensive guide, we delve into the most effective and game-changing Gekko Molly lineups that the professional scene has seen in 2023. From the utility-centric to those designed purely for damage, these lineups promise to give you the edge, whether you're grinding the ladder or duking it out in high-stakes tournaments.
We will dissect each lineup in terms of its positioning, utility, timing, and its compatibility with other agents' abilities. Additionally, we will provide you with pro tips on how to best utilize Gekko's Molly and the agent in varying in-game situations and map locations, so you can outmaneuver your opponents every step of the way.
Gekko Molly Lineups
Gekko’s Molly is unique as opposed to other abilities of a similar kind in the game. It is not for instant damage, but more for area control. Anyone staying in the molly will instantly die rewarding you with the kill. However, it doesn’t deal damage to anyone staying in it until a certain period of time passes. What you get in return is the amount of space it covers, making it perfect for timed lineups and here you will find our best collected ones yet:
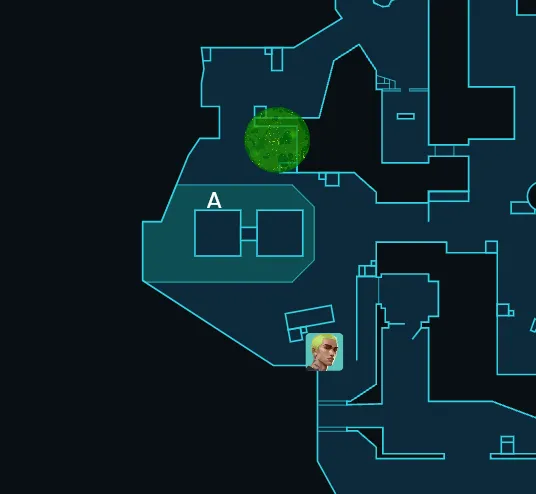
A Site - Default

What Does It Cover: This molly landing on A, default planting spot will ensure to get anyone off the spike in no time. Especially with the new Gekko update, you will be fast to deal damage and stop anyone from defusing.
When To Use It: Best used in scenarios where you are lurking to wrap around enemies from Mid, using this lineup can help you in times where your teammates couldn’t hold up and died to the enemies sooner than anticipated.
What Makes It Special: This lineup is relatively quick so you don’t have to worry about enemies getting to defuse the spike before you peek.

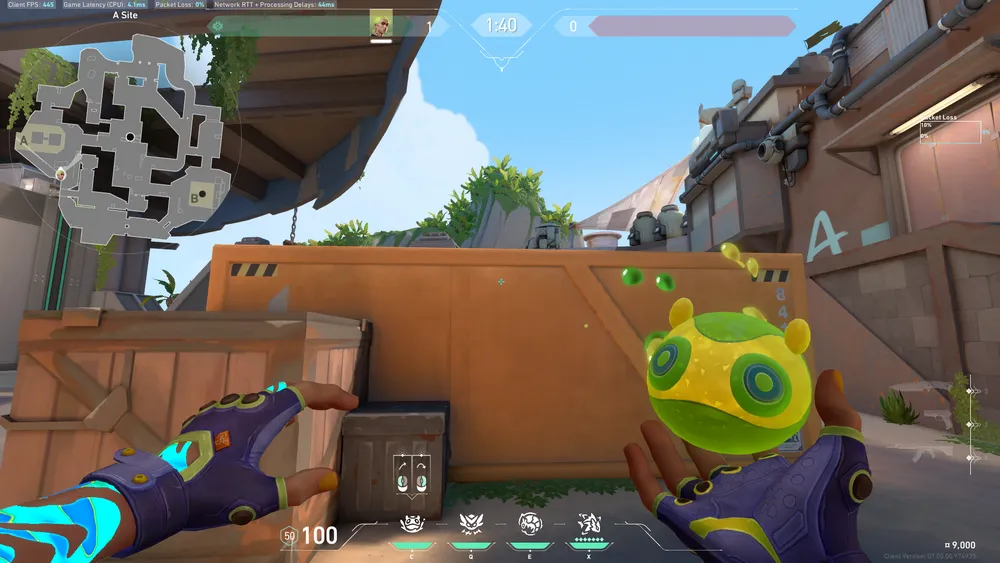
To do it, come and align yourself with the corner of the boxes on mid and then aim your crosshair just under the cables of the tower building like in the picture. Then, jump and throw your molly.
A Site - Bricks
What Does It Cover: This second lineup on A site will hit directly behind bricks, a common spot for attackers to hide in post plant positions frankly it is a powerful position, and clearing with this lineup can be very impactful.
When To Use It: Best used in any retake situation that you could come upon on A site. Moving from yellow, throw your molly and pick enemies trying to reposition.
What Makes It Special: The lineup is quick and rather effective, making it one of the good usages to your ability.
To do it, come behind Yellow and aim your crosshair right at this spot. And then, jump and throw your molly; it will land quickly on Bricks.
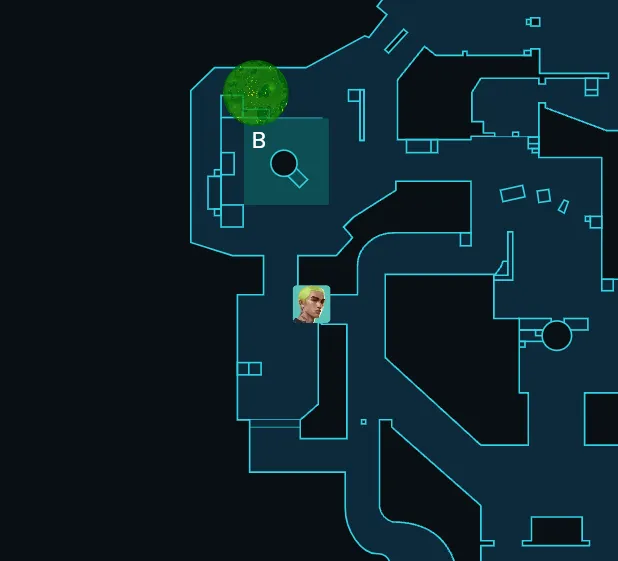
B Site - Default

What Does It Cover: This lineup on B site will land directly on the default planting spot. Although it can cover up to most of pillar towards site.
When To Use It: Best used as a way to delay enemies from defusing the spike or to completely throw them off and run to window so you can peek the diffuser and earn free kills.
What Makes It Special: It is a really easy and fast lineup which grants you maximum chances of winning the round.

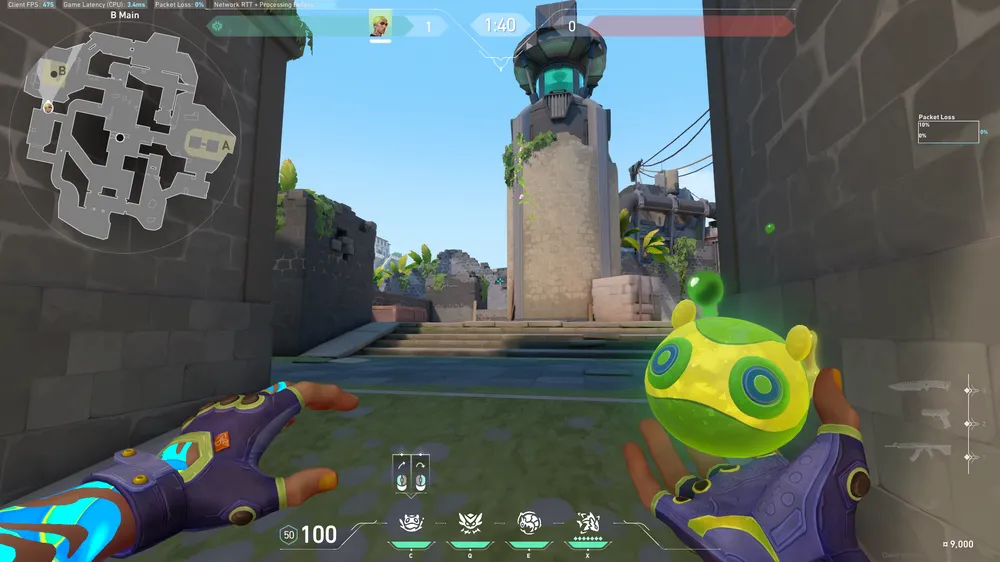
To do it, simply come and stand in this corner and then aim your crosshair just as in the picture. Then, jump and throw your molly.
B Site - Backsite
What Does It Cover: This second lineup on B site will land directly onto back site, covering anyone standing there with little gaps to escape or avoid damage from.
When To Use It: This molly lineup will usually result in a free kill for you, as enemies are often to use that position to their advantage and this molly covers it.
What Makes It Special: It’s a pretty quick molly which gives you time to react if enemies walk out of that space trying to escape the molly.
Simply as you walk up to B site aim your crosshair at this spot and then throw your molly while running.
Pro Tips
- Keep in mind that Gekko’s Molly works quite differently. It has a cooldown before it explodes killing anyone standing inside its radius, but it will not deal any damage until that timer has run out.
- Players can still dodge the molly by running out of it. This is because the molly’s damage comes fast but not in one instant making it possible for some to jump out of it at the right moment. That will still deal some damage though.
- Since your Molly takes time to activate, this could allow enemies to defuse the spike up to the half depending on the timing and usage of it. Keep that in mind going in any match and using your lineups.
- Always remember to ask for accompanying utility from your teammates as it can be a tremendous help for your own set of plays with Gekko. Especially in post-plant scenarios.
- Gekko’s Molly is the only piece of utility that you will be able to pick back up after using. So be precise and ensure that you only use it when you can capitalize on it.
- In case you use your Molly to clear an angle, do not look away from it just as you throw your ability. You will have to hold the corner for a bit more to ensure that nobody is there as if you catch enemies they will come out swinging and you want to be ready for that.
- Aside from teammate utility, you can always use Dizzy (Flash Ability) in pair with your Molly lineup. While enemies might stick to the defuse even if the molly hits them, they will definitely get off when fully flashed as they will be scared of you peeking or pushing toward them. In addition, it reveals their position which tells you if they are defusing or not.


