How to Make Clothes on Roblox (T-Shirts, Shirts and Pants)

Welcome to the colorful and creative world of Roblox, where your imagination has the power to create masterpieces! If you've ever played Roblox, you know that one of the most fun aspects of the game is customizing your character's appearance with cool outfits and accessories. But have you ever thought about designing and making your own clothes on Roblox? If so, you've come to the right place!
In this comprehensive guide, we will walk you through the process of creating unique, fashionable, and eye-catching clothing items on Roblox, which you can use to style your avatar or even sell in the game's marketplace. Whether you're a seasoned designer or a budding artist, our step-by-step instructions will help you bring your ideas to life and make a statement in the Roblox universe. So, grab your virtual sketchbook, and let's dive into the world of Roblox fashion design!
Getting Started: Tools and Resources
Before diving into the world of Roblox fashion design, it's essential to familiarize yourself with the tools and resources you'll need to make your custom clothing items.
Roblox Studio

Roblox Studio is the official development environment for creating games and experiences on the Roblox platform. While you won't be designing your clothing items directly in Roblox Studio, you'll need it to upload and manage your creations. If you haven't already, download and install Roblox Studio from the official Roblox website. Once installed, you can access it by logging in with your Roblox account.
Graphic design software (e.g., Pixlr, Photoshop)
To design your clothing items, you'll need graphic design software that allows you to edit and manipulate images. There are several programs available, both free and paid, that you can use for this purpose. Some popular options include:
- GIMP (GNU Image Manipulation Program) - A free and open-source image editor that offers a wide range of tools and features. It's an excellent choice for beginners and those on a budget.
- Adobe Photoshop - A professional-grade image editor that offers a comprehensive set of tools and features for creating complex designs. While it's a powerful tool, it comes with a monthly subscription fee.
- Pixlr - Pixlr is a user-friendly, web-based photo editing tool that offers a range of features for creating and manipulating images. It provides an accessible alternative to more complex software like Photoshop, making it an ideal choice for beginners and those looking for a free image editing solution.

Choose the software that best suits your needs and level of experience. You may also want to explore additional options, like Paint.NET or Affinity Photo depending on your preferences.
Roblox templates
Roblox provides clothing templates to help you get started with designing your custom items. These templates serve as a base for your design, showing you the layout of the shirt or pants on a 2D plane.

You can download the official Roblox templates for shirts and pants directly from the Roblox Developer Hub. Make sure to save the templates in a format compatible with your chosen graphic design software, such as PNG or PSD.
With these tools and resources, you can begin designing your own custom clothes on Roblox.
Designing Your Clothing Item
Now that you have the necessary tools and resources, it's time to start making your custom clothing item and outfits on Roblox.

Understanding Roblox clothing templates
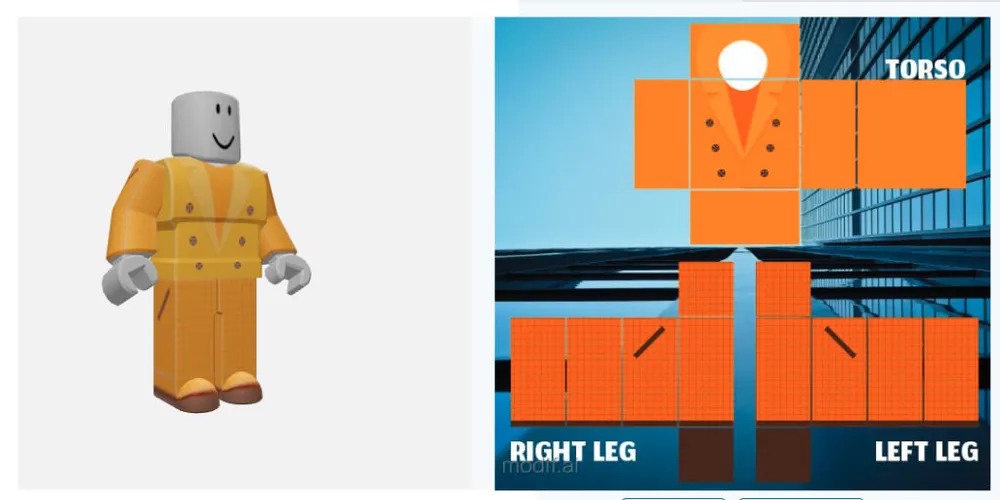
Shirt template: The shirt template consists of a flat 2D image that represents the front, back, and sides of a shirt, as well as the sleeves and shoulders. When customizing the template, it's essential to pay attention to each section and ensure that your design flows seamlessly across the different parts of the shirt.
Pants template: Similar to the shirt template, the pants template is a flat 2D image that represents the front, back, and sides of a pair of pants, as well as the waistband and leg openings. Be mindful of the different sections when designing your pants to create a cohesive look.
Customizing the template with a graphic design software
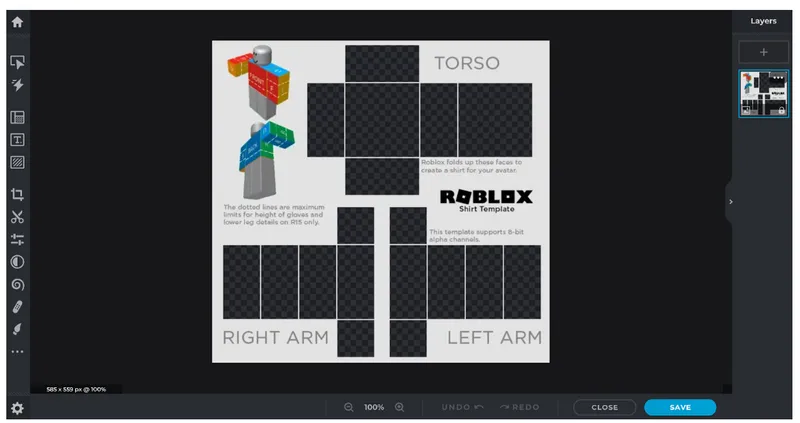
After downloading the template, you're ready to start customizing your clothing items on Roblox. While you can use any image editing software, we recommend the online tool Pixlr for its simplicity and user-friendly interface.

Don't worry about mastering every feature in Pixlr; we'll guide you through the crucial steps needed to design your custom clothes on Roblox.
- Begin by importing the template into the Pixlr tool.
- Create a new layer by clicking the "+" icon on the right side of the screen.
- You can pick the “Marquee Select” tool to customize the color of the specific cloth sections.
- Highlight the area you want to modify the color.
- Apply the “Fill tool” to change the selection to your desired color.
- To avoid a bland look, search for pre-shaded templates on Google Images.
- Import the shaded template by clicking the "+" icon again and upload the photo.
- Activate the "Wand Select" tool from the left toolbar, selecting the entire uploaded picture.
- Utilize the “eraser tool” to eliminate the extra background and align the shaded template with the original.
- Adjust the transparency of the "shaded template" to control the intensity of the shading effect.
- To insert new images, use the "plus" icon once more and position the new photo on your clothing item.
By following these steps and using the tools provided, you'll have the ability to create a wide array of designs to suit your taste. Feel free to include your favorite images! Just ensure you stay within the boundaries of the Roblox-provided template, and you'll be ready to upload and showcase your unique creation!
Exporting your design
Once you've completed your design, you'll need to save it in a format that's compatible with Roblox. Typically, this will be a PNG file with a transparent background. Be sure to maintain the original dimensions of the template (585x559 pixels for shirts and pants) when exporting your design. With your design completed and exported, you're ready to move on to the next step: upload your custom clothes on Roblox.
Uploading Your Designed Clothes to Roblox
Once you've designed your custom clothing item, it's time to share your creation with the Roblox community. In this section, we'll cover the steps to prepare, upload, and set the price and description for your item.

Uploading the Clothes on Roblox:
- Log in to your Roblox account and navigate to the "Create" tab.
- Under "My Creations," select either "Shirts," "T-Shirts," or "Pants," depending on the type of clothing item you've created.

- Click the "Choose File" button and locate the PNG file of your design on your computer.
- Enter a name for your clothing item in the "Name" field.
- Click "Upload" to submit your design for moderation.
Note: your design will be reviewed by Roblox moderators before it becomes publicly available. This process may take anywhere from a few minutes to a few hours.
Setting the price and description for your item
- Once your design has been approved, return to the "Create" tab and find your clothing item under "My Creations."
- Click the gear icon next to your item and select "Configure."
- In the "Item Details" section, enter a description for your clothing item to help potential buyers understand your design and its inspiration.
- Navigate to the "Sales" tab within the configuration menu.
- Check the box next to "Item for Sale" to make your clothing item available for purchase.
- Set a price for your item in Robux, remember that Roblox takes a percentage of the sale price as a transaction fee.
- Click "Save" to finalize your settings.
Your custom clothing item is now available for purchase in the Roblox marketplace. Congratulations on your achievement, and happy designing!


