Best Omen One Ways For Breeze

Mastering the intricacies of each agent is key to securing victory on the battlefield. One such agent, the shady fighter, shadow taker Omen, possesses a unique set of abilities that, when used correctly, can scatter the players and control the battlefield all to your advantage. Among his abilities is Dark Cover, a smoke that suppresses vision on a selected area allowing you to benefit from it by taking control and advancing into sites.
This guide will delve into the best Smoke One Ways for Omen in Breeze. You'll discover not just the most advantageous spots, but also learn the correct timings, best tactics, and optimal scenarios to use these spots to maximum effect. Whether you're a seasoned Omen player looking to up your game, or a newcomer eager, this comprehensive guide is your ticket to becoming a controller menace in Valorant.
Omen - One Ways
Utilizing one ways over normal smokes can be detrimental and game-changing as it shifts around how you and the enemy team will approach any area with that smoke included. Using one ways is a much more efficient options in certain spots as it turns it from a 50/50 situation to a 100 to your advantage. Here we will cover attacking and defensive spots, including retakes and specific scenarios with instructions on how to approach it as an omen player. Here you will find the best mixture that combines all of these aspects together:
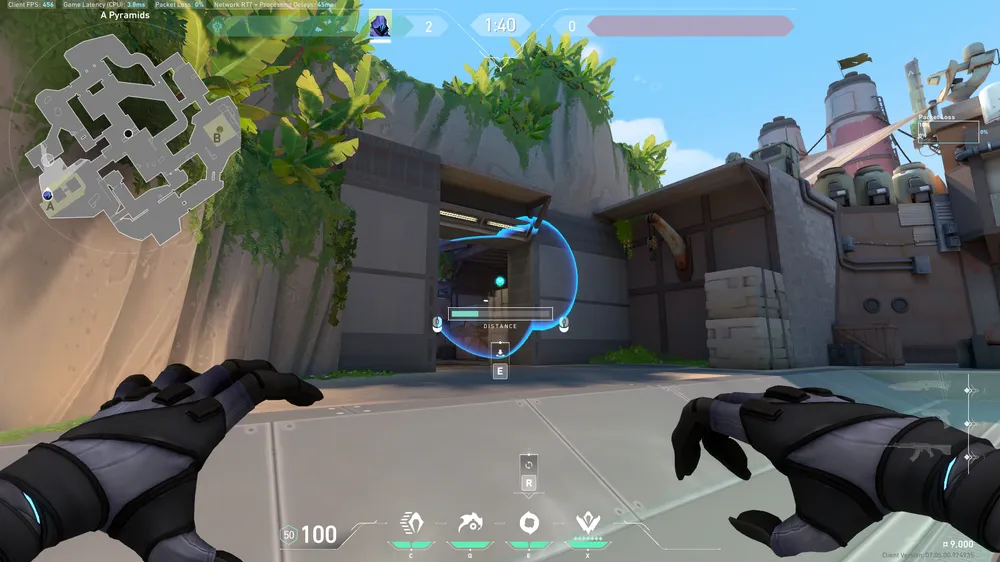
A Site - Defense

What Does It Cover: This one way on A site will cover up anyone trying to walk up from A main, it is a strong block for anyone coming out and it allows you to play from positions such as right side and double doors.
When To Use It: Best used in defensive scenarios where you want to ensure that enemies don’t walk out into site without getting punished as this one way will definitely place weights on their thoughts next time they go A.
What Makes It Good: This one way is exceptional as it forces enemies to follow one way into site which can give you plenty of space to corner them.
A Site - Defense 2

What Does It Cover: Over to the second one way lineup on A site, this smoke will target A main more specifically and stop anyone pushing out of Main.
When To Use It: Best used if you are looking to hold A main push from the left side, whether that be on cubby or next to the pyramids but this one way will allow you to punish anyone coming out from that position.
What Makes It Good: This smoke is quite fast, making it viable for instant smokes on A and it will strengthen your hold by a lot.
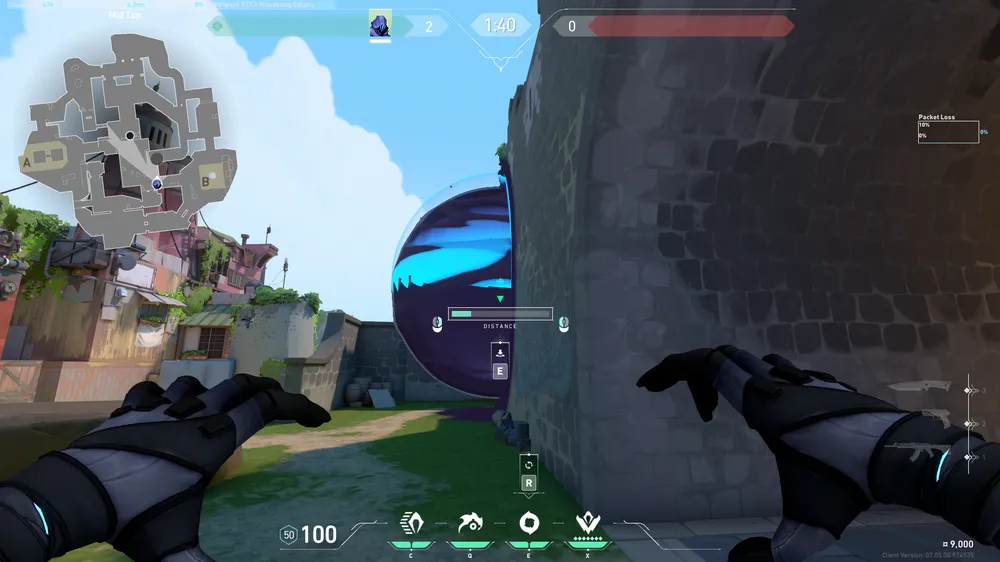
Mid - Elbow

What Does It Cover: This smoke on Elbow mid will ensure that nobody can cross out of Elbow out to mid or tunnel as it covers that area entirely by providing a one-edged fight to your favor holding from tunnel or nest.
When To Use It: Best used in defensive scenarios where you want to make sure that enemies don’t use their eco round to push aggressively and take control on mid.
What Makes It Good: Best part about this smoke is how fast it is to use and hold and it always grants free kills.
B Site - Defense

What Does It Cover: Simple one way on B site that will block enemies from crossing to back site as it creates a huge disadvantage to anyone trying to cross out while you are holding.
When To Use It: Best used if enemies have strict entries that go to back site as it is a significant part of B site to retain control of.
What Makes It Good: It is very easy to punish enemies using this smoke so do not hesitate to use it as it can catch attackers off guard.
Pro Tips
- It is entirely up to preference, but pressing “R” will shift the view in your smoke ability to be in the real map, making it easier to identify and tell where your smokes are getting placed. You can always switch between these two options for what suits you best.
- Using one ways means you are looking to turn that smoke from a cover to a possible fight. Only that you will have every advantage in that fight, meaning if you ever use a one way you should definitely watch over it and take control of that space unlike regular smokes that you use to deny enemies.
- There is a green arrow when you are using your smoke that refers to where your ability is going to be casted, following the instructions and that arrow you will be even able to create any smoke as long as you can identify where it is going to be placed.
- Remember that each one way has an advantageous and disadvantage side, meaning if you are to place a one way as an attacker, this means if you ever end up repositioning to the spot you smoked you will be the one at a disadvantage, always make sure you are on the right side doing the right play.
- By placing your smokes higher it will take more time for it to float down and reach the supposed area, this allows you to create some creative and unique plays if you wish to do so.


