The Best Killjoy Setups On Split
This will be the only guide you need to play Killjoy on the map Split. Especially with the new additions to split and the appearance into the map rotation once again, it offers unique challenges and opportunities for Killjoy mains.
Whether you're a seasoned veteran or a newcomer to the character, this guide will provide you with valuable insights and strategies to dominate your opponents on this map. From defending the bomb sites to setting up sneaky traps, we'll cover everything you need to know to become a master of Split as Killjoy. So, put on your thinking cap, grab your toolbox, and let's get started!
Killjoy Setups - Attacking Side
While Killjoy is often associated with defensive playstyles, she can also be a valuable asset for the attacking team on this map. With her unique abilities, Killjoy can help control areas of the map and create opportunities for her team to push towards the enemy's territory. Especially when it comes to lurking which is commonly known as “rat gameplay” but yet one of the most effective ways to manipulate your attacking side. We will show you the best ways you can use Killjoy on Split Attack:
A Site:
When we are talking about Killjoy in the attacking side, we’re most likely referring to a way you can “lurk” and manipulate the outcome of the round as a sentinel. Now there are two ways to lurk, you can either fast lurk which is to instantly push after your teammates make presence in the planned site or late lurk which is when you wait to ensure no enemies are holding you.
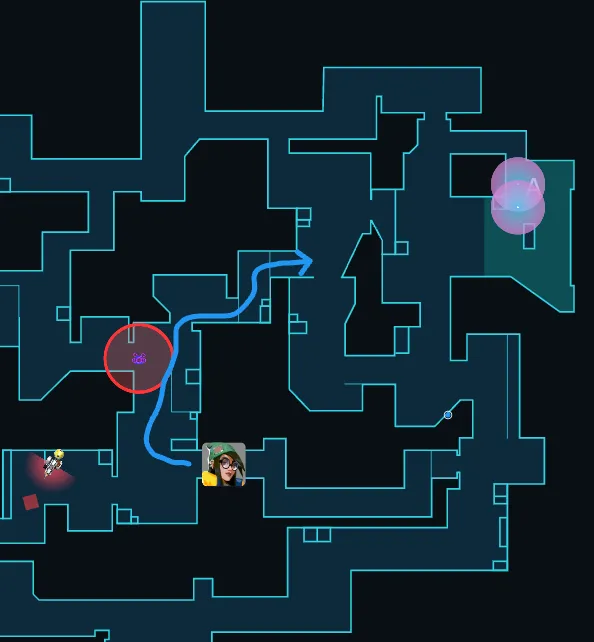
Both have their times and conditions and we will let you judge that as it’s dependent on the enemy team, so for the particular setup to hit A site:
Place your turret on B lobby to hold any B main push from defenders and walk up as shown in the picture. Place your alarmbot behind you if you were fast flanking to make sure you’re not getting flanked and as you get your kill and make your way throw your swamp grenades on the spike.
B Site:

If you’re planning to hit B site, this setup is for you. You will always be fixated in mid as it’s where you can lurk on this map, place your turret towards sewers to hold any aggression from defenders on A site and walk up as shown.
Then place your alarmbot on vents to cover up any late rotation and throw your swamp grenades (mollies) on the default box.
Pro Tip: Killjoy mollies damage does go through walls meaning you don’t need to exactly land it on the spike but within the ability’s range is good enough.

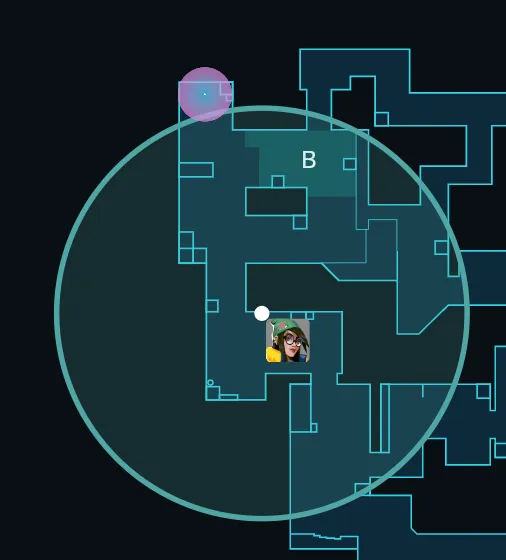
As we know, mid is the most important factor of split. It allows for complete control over the course of the game and here’s a setup where you can fixate yourself on holding mid. Most likely, by your own.
If you successfully hold mid, that can also help you to prevent any rotations and place a lot of pressure on the defenders.
Place your alarmbot on B lobby to cover your flank, put your turret on top of the box and use your mollies accordingly on vents and B heaven.
This will place a lot of pressure and keep enemies off simply rotating through mid.
Killjoy Setups - Defending Side
With Killjoy’s unique kit of abilities, she is a valuable asset for any team looking to defend key areas of the map. Her skills allow her to set up traps and control areas of the map, making it difficult for the enemy team to push forward. But you can only do so much when you’re lacking knowledge as to how place your utility right, so here are the best killjoy setups to defend your site on split:
A Site:
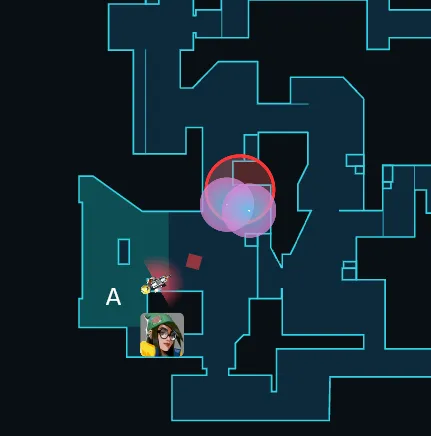
This is the endgame setup for prevent any executes on A site, assuming you are looking to go full on site and ignore A heaven.
Start by placing your alarm bot on the corner next to the downway into A site, with 2 mollies on it covering the cubby. Then place your turret on top of the box on A site or even on top of screens if you’d like.
This way, you can peek of your alarmbots contact as your mollies are activated.

Alternatively, if you are worried about A heaven and you want to secure that too here’s a killer for both. Place your alarm bot on A heaven and a swamp grenade on it, with your turrent in the same spot so it can as well have a line of sight into A heaven.
Keep your second molly on the default planting spot to delay plants if they do enter site.
This setup is mostly for retakes, keeping A heaven secure is essential for a successful retake operation.
B Site:

Defending B is simple, frankly it is killjoy’s strong suit. Place your alarmbot with two mollies in front of it to cover for any fast execution, even like so Jett dashes and raze satchels.
Then place your turrent on the top right corner (top left for attackers) to make it hard for them to destroy it while dealing with all the utility.
Killjoy Setups - Attack Ultimate Spots
One of Killjoy’s key abilities is her ultimate which allows her to force enemies out to obtain control and space. Her ultimate is superior when taking a site, It is a free card to plant the spike in most cases. However, you do need to consider where you are going to place your ultimate as it has a certain range which if placed improperly will not benefit you as much. Here are the most common ultimate spots for killjoy on the attacking side:
A Site:
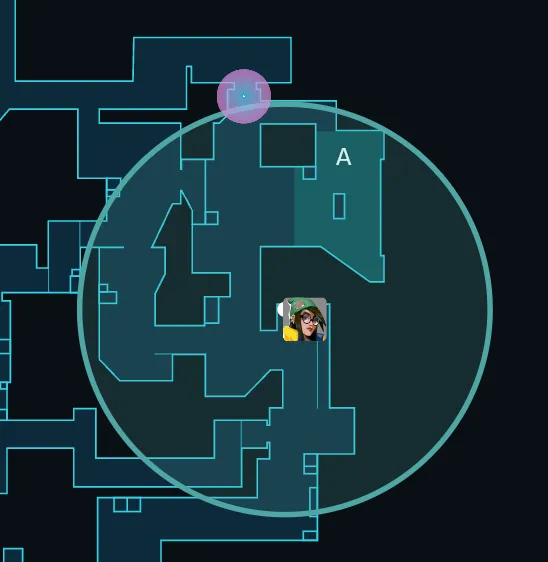
This is the best way to use your ultimate on A site. It is the safest and the one that provides most coverage, it will clear most of A heaven and site entirely. Just beware of players on Screens and far back in A heaven as if you didn’t have any smokes they can catch you off guard.
Pro Tip: DO NOT push site before your ultimate is almost ending. This is a mistake many do, but you are supposed to wait until there are 3-4 seconds on the line of your ultimate then start your execution.
B Site:
On B, all you need to do is take B main control which is relatively easy and safe. After that, place your ultimate as shown in the picture and wait for it.
It will cover the entirety of site and B heaven. However, defenders in back site can still find some leverage but that is easily counterable by any molly or nade-like utility as it’ll clear them out completely.
If it doesn’t catch them, utility will kill them which in both cases a win win scenario.